
 So the last couple of nights, and some portions of the last couple of days have been occupied with the final construction of the kid's Mini-boo. Our nomadic lifestyle helped "Santa brings your presents to three places because he doesn't know where you'll be" win out over "Baby Jesus is OVER, kid; now we're on to Hannukah." It's funny, though, because the kid's Santa construct is almost entirely dependent on us anyway at this point; when she saw me pop riveting the Mini-boo yesterday afternoon, all I had to say was that Santa was working on the seat while I was working on the frame.
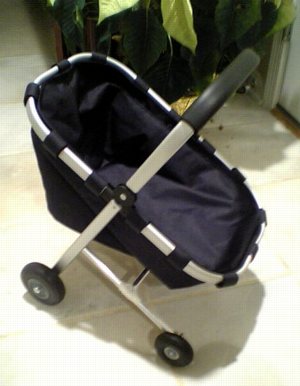
Anyway, the unwrapping was set--tonight at Grandma's house--and we nearly made it in time. The wheels aren't right yet [more on that after the jump]; it broke in the trunk [see the duct tape?]; and there's more stitching to be done, but it's basically real, and it works. And the kid LOVES it. In fact, the Mini-boo is a menace already. Would she have gone bonkers for any old crappy toy stroller we gave her? Probably.
But call me old-fashioned, but I get all choked up knowing that she went bonkers over a crappy toy stroller I spent endless days and stupid money on.
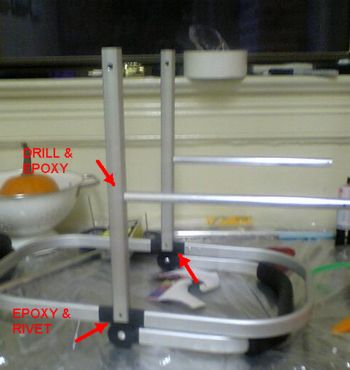
Attaching the struts turned out to be one of the easiest things to do, although the epoxying step had intimidated me at first. The small struts got pounded and epoxied into the larger ones, then before the epoxy set, I just made sure they were square, and that the axle holes lined up properly.
Likewise, attaching the now-T-shaped struts to the basket was easy, too. Same alignment, same epoxy, no pounding this time, though. One thing I found I had to do was redrill a hole in the plastic for the pop rivets. Now that I see how soft that plastic is and how easy it is to drill, I'd probably just pre-drill the aluminum strut holes, attach them, and then drill through the ABS after the epoxy dries.
It also turned out that the first, outside rivets I attached were medium length and too long to allow rivets on the other side. I had to get short rivets, which worked fine. Who knew, I could've used them all around. [Anyone in the market for 97 rivets?]
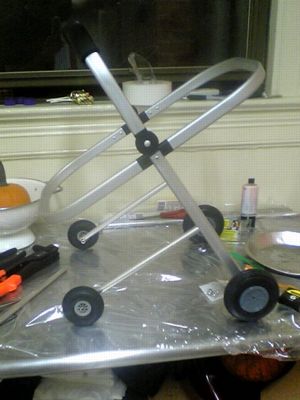
When I stood the Mini-boo up and mocked up the wheel/axles for the first time, I was like, "Awesome!" Then it went downhill from there. I knew I'd need to attach some bracing between the two small struts, whether across/as an axle or higher up. I chose to have the wheels ride independently, and to expoxy an aluminum rod with concave cutouts on the ends halfway up. That's the piece you see duct taped in the top picture; the epoxy broke off twice on one side yesterday, then again tonight in the car. I'll probably end up threading a thin bolt through the crossbar and the struts and capping them on the outside with bolts or acorn nuts. Less elegant, but at this point, it's all I can do.
Meanwhile, the little wheels are kind of floppy. I ditched the model airplane strut/axle and collars because they were too weak. Now the wheels ride on 6/32" x 2" bolts with spacer/collars and an acorn cap, and they need something like a full-width axle to keep them level. A drilled out hole that's large enough to let the axle turn is also large enough to create some floppy play. It's clowncar annoying.
The big wheels were also a pain. Right now, they're riding on 1/4" x 2 1/2" bolts that are only threaded at the end, but this is a stopgap. With one crossbar pushing out, I figured I'd need a counterforce, so I plan to run two 6" bolts together with a coupler to provide some inward counterpressure. Only the coupler I bought turned out to be 1/2" or so too short [or the wheels are each 1/4" to wide]. Also, all my eyeballing has left the two sides about 1/4" off alignment, which will make for a rather tight/tense axle. You may want to test and assemble all this before gluing the frame together, heads up.
What else is left? The seat is sewn in place along the top inside, but the extra fabric needs to be tacked into place underneath. And we'll add a little velcro belt inside [do you really want to teach your kid how to do and undo an actual stroller-style buckle? No.] The kid apparently likes to push it facing forward, using the edge of the basket, not the handle. Oh, and as it turns out, the handle height is perfect for our 90cm +/- kid. I figure I'll be tweaking on this thing all winter, getting ready for the first real outdoor tests in Spring.

that's amazing. i want one.
That turned out great. I'd be a little worried about the joint where the struts to the back wheels intersect with the front legs though. If the user leans on the handle, that point is going to see a lot of stress. You might want to rivet in a little triangular gusset at that point.
I'm surprised Bugaboo doesn't sell their own toy version. Of course it would cost $300. :)
[thanks, and you're right. I've got 197 rivets burning a hole in my pocket, so I've been thinking about what to rivet next, and those joints are first on the list. -ed.]
How long is the waiting list for one of these?
;)
Wow Greg, it's sweeeeet!
Wow, that turned out great!
Last night we had some people over and saw my friend carrying one of the Hold everything Bags you used and my first thought was, "Hey, that looks like a Bugaboo seat!" She didn't really get it when i mentioned it to her.
happy new year!
This is so great! I remember seeing those baskets in the Garnet Hill catalog and trying to get my husband (the handy one, with a sculpture background) interested in making a mini stroller for Roo to replace the Barbie Princess monstrosity grandma gave her but he wasn't into it. I need to show him how well yours turned out so his innate competitive male streak will force him to try and outdo you...